Popular Posts

Sorry. No data so far.

Ben McCann

Co-founder of Connectifier.
Investor at C3 Ventures.
Google and CMU alum.

Ben McCann on LinkedIn Ben McCann on AngelList Ben McCann on Twitter

Opening Photoshop .psd Files without Photoshop

02/07/2008

A client sent me a Photoshop .psd file today containing a mock-up of a site he’s interested in having me design. Unfortunately, at the time I received the email, I was on a computer which did not have Photoshop installed, so I had no way to read or view the file. I downloaded GIMP (GNU Image Manipulation Program) and it worked perfectly. The only con with GIMP is that it’s not exactly lightweight if you just want to view a single .psd file, but I don’t mind having it installed as I may find other opportunities to use it.

In other unrelated software news, I heard today that a game called Guitar Rising is in development, which is basically a Guitar Hero knockoff except that you can plug in a real guitar!

Showdown – Java HTML Parsing Comparison

02/02/2008

I had to do some HTML parsing today, but unfortunately most HTML on the web is not well-formed like any markup I’d create. Missing end tags and other broken syntax throws a wrench into the situation. Luckily, others have already addressed this issue. Many times over in fact, leaving many to wonder which solution to implement.

Once you parse HTML, you can do some cool stuff with it like transform it or extract some information. For that reason it is sometimes used for screen scraping. So, to test the parsing libraries, I decided to do exactly that and see if I could parse the HTML well enough to extract links from it using an XQuery. The contenders were NekoHTML, HtmlCleaner, TagSoup, and jTidy. I know that there are many others I could have chosen from as well, but this seemed to be a good sampling and there’s only so much time in the day. I also chose 10 URLs to parse. Being a true Clevelander I picked the sites of a number of local attractions. I’m right near all of the stadiums, so the Quicken Loans Arena website was my first target. I sometimes jokingly refer to my city as the “Mistake on the Lake” and the pure awfulness of the HTML from my city did not fail me. The ten URLs I chose are:

http://www.theqarena.com
http://cleveland.indians.mlb.com
http://www.clevelandbrowns.com
http://www.cbgarden.org
http://www.clemetzoo.com
http://www.cmnh.org
http://www.clevelandart.org
http://www.mocacleveland.org
http://www.glsc.org
http://www.rockhall.com

I gave each library an InputStream created from a URL (referred to as urlIS in the code samples below) and expected an org.w3c.dom.Node in return once the parse operation was completed. I implemented each library in its own class extending from an AbstractScraper implementing a Scraper interface I created. This was a design tip fresh in my mind from reading my all-time favorite technical book: Effective Java by Josh Bloch. The implementation specific code for each library is below:

NekoHTML:

final DOMParser parser = new DOMParser();
try {
	parser.parse(new InputSource(urlIS));
	document = parser.getDocument();
} catch (SAXException e) {
	e.printStackTrace();
} catch (IOException e) {
	e.printStackTrace();
}

TagSoup:

final Parser parser = new Parser();
SAX2DOM sax2dom = null;
try {
	sax2dom = new SAX2DOM();
	parser.setContentHandler(sax2dom);
	parser.setFeature(Parser.namespacesFeature, false);
	parser.parse(new InputSource(urlIS));
} catch (Exception e) {
	e.printStackTrace();
}
document = sax2dom.getDOM();

jTidy:

final Tidy tidy = new Tidy();
tidy.setQuiet(true);
tidy.setShowWarnings(false);
tidy.setForceOutput(true);
document = tidy.parseDOM(urlIS, null);

HtmlCleaner:

final HtmlCleaner cleaner = new HtmlCleaner(urlIS);
try {
	cleaner.clean();
	document = cleaner.createDOM();
} catch (Exception e) {
	e.printStackTrace();
}

Finally, to judge the ability to parse the HTML, I ran the XQuery “//a” to grab all the <a> tags from the document. The only one of these parsing libraries I had used before was jTidy. It was able to extract the links from 5 of the 10 documents. However, the clear winner was HtmlCleaner. It was the only library to successfully clean 10/10 documents. Most of the others were not able to make it past even the very first link I provided, which was to Quicken Loans Arena site. HtmlCleaner’s full results:

Found 87 links at http://www.theqarena.com/
Found 156 links at http://cleveland.indians.mlb.com/
Found 96 links at http://www.clevelandbrowns.com/
Found 106 links at http://www.cbgarden.org/
Found 70 links at http://www.clemetzoo.com/
Found 23 links at http://www.cmnh.org/site/
Found 27 links at http://www.clevelandart.org/
Found 51 links at http://www.mocacleveland.org/
Found 27 links at http://www.glsc.org/
Found 90 links at http://www.rockhall.com/

One disclaimer that I will make is that I did not go out of my way to improve the performance of any of these libraries. Some of them had additional options that could be set to possibly improve performance. I did not delve into wading through the documentation to figure out what these options were and simply used the plain vanilla incantations. HtmlCleaner seems to offer me everything I need and was quick and easy to implement.  One drawback to HtmlCleaner is that it’s not available in a Maven repository.  Sometimes NekoHTML may be easier to use for this reason.  Note also that at the time of writing the last released version of jTidy was from 2000.  A newer .jar has since been made available that will likely perform better.

Web Services Tutorial with Apache CXF

02/01/2008

I created a web service today with CXF and wanted to share the steps it took to get it up and running in this quick tutorial. Apache CXF was created by the merger of the Celtix and XFire projects. I chose to implement my service in CXF because some colleagues had been using XFire and would likely want to upgrade at some point. I am using the latest version, which is 2.0.4. While the library itself seems to be of high quality, the documentation is still a work in progress. However, do not fret because this CXF tutorial will get you up and running in no time. I will be creating a simple web service that will allow the retrieval of employee information. The service will return this simple POJO (Plain Old Java Object) bean with matching getters and setters:

package com.company.auth.bean;

import java.io.Serializable;
import java.util.Set;

public class Employee implements Serializable {

	private static final long serialVersionUID = 1L;
	private String gid;
	private String lastName;
	private String firstName;
	private Set<String> privileges;

	public Employee() {}

	public Set<String> getPrivileges() {
		return privileges;
	}

	public void setPrivileges(Set<String> privileges) {
		this.privileges = privileges;
	}	

	public String getFirstName() {
		return firstName;
	}

	public void setFirstName(String firstName) {
		this.firstName = firstName;
	}

	public String getGid() {
		return gid;
	}

	public void setGid(String gid) {
		this.gid = gid;
	}

	public String getLastName() {
		return lastName;
	}

	public void setLastName(String lastName) {
		this.lastName = lastName;
	}

	public boolean isUserInRole(String role) {
		if(privileges == null) { return false; }
		else { return privileges.contains(role); }
	}

}

First off, you need to download Apache CXF and drop the necessary .jars in your WEB-INF/lib directory:

aopalliance-1.0.jar
commons-logging-1.1.jar
cxf-2.0-incubator.jar
geronimo-activation_1.1_spec-1.0-M1.jar (or Sun’s Activation jar)
geronimo-annotation_1.0_spec-1.1.jar (JSR 250)
geronimo-javamail_1.4_spec-1.0-M1.jar (or Sun’s JavaMail jar)
geronimo-servlet_2.5_spec-1.1-M1.jar (or Sun’s Servlet jar)
geronimo-ws-metadata_2.0_spec-1.1.1.jar (JSR 181)
jaxb-api-2.0.jar
jaxb-impl-2.0.5.jar
jaxws-api-2.0.jar
jetty-6.1.5.jar
jetty-util-6.1.5.jar
neethi-2.0.jar
saaj-api-1.3.jar
saaj-impl-1.3.jar
spring-core-2.0.4.jar
spring-beans-2.0.4.jar
spring-context-2.0.4.jar
spring-web-2.0.4.jar
stax-api-1.0.1.jar
wsdl4j-1.6.1.jar
wstx-asl-3.2.1.jar
XmlSchema-1.2.jar
xml-resolver-1.2.jar

The first thing which needed to be done was to create the service interface. The service interface defines which methods the web service client will be able to call. It’s pretty standard Java with just two JWS (Java Web Service) annotations thrown in:

package com.company.auth.service;

import javax.jws.WebService;
import javax.jws.WebParam;
import com.company.auth.bean.Employee;

@WebService
public interface AuthService {
    Employee getEmployee(@WebParam(name="gid") String gid);
}

The @WebParam annotation is in fact optional, but highly recommended since it will make like easier for the end consumers of your service. Without it, your parameter would be named arg0 making it less clear what parameters your service actually takes.

Implementing the actual service comes next:

package com.company.auth.service;

import javax.jws.WebService;

import com.company.auth.bean.Employee;
import com.company.auth.dao.EmployeeDAO;

@WebService(endpointInterface = "com.company.auth.service.AuthService", serviceName = "corporateAuthService")
public class AuthServiceImpl implements AuthService {

	public Employee getEmployee(String gid) {
		EmployeeDAO dao = new EmployeeDAO();
		return dao.getEmployee(gid);
	}

}

I then had to tell Spring (which is used by CXF) where to find my Java classes. I created the following cxf.xml file inside my package directory (com/company/auth/service):

<beans xmlns="http://www.springframework.org/schema/beans"
      xmlns:xsi="http://www.w3.org/2001/XMLSchema-instance"
      xmlns:jaxws="http://cxf.apache.org/jaxws"
      xsi:schemaLocation="http://www.springframework.org/schema/beans
 					http://www.springframework.org/schema/beans/spring-beans.xsd
 					http://cxf.apache.org/jaxws
 					http://cxf.apache.org/schemas/jaxws.xsd">

  <import resource="classpath:META-INF/cxf/cxf.xml" />
  <import resource="classpath:META-INF/cxf/cxf-extension-soap.xml"/>
  <import resource="classpath:META-INF/cxf/cxf-servlet.xml" />
  <jaxws:endpoint id="auth"
                  implementor="com.company.auth.service.AuthServiceImpl"
                  address="/cxfAuth"/>
</beans>

Finally, I updated my WEB-INF/web.xml file to let CXF know where my cxf.xml file was and define the CXF servlet:

<?xml version="1.0"?>
<!DOCTYPE web-app PUBLIC "-//Sun Microsystems, Inc.//DTD Web Application 2.3//EN"
"http://java.sun.com/dtd/web-app_2_3.dtd">

<web-app>
  <display-name>Auth Manager</display-name>
  <context-param>
    <param-name>contextConfigLocation</param-name>
    <param-value>classpath:com/company/auth/service/cxf.xml</param-value>
  </context-param>
  <listener>
    <listener-class>
      org.springframework.web.context.ContextLoaderListener
    </listener-class>
  </listener>
  <servlet>
    <servlet-name>CXFServlet</servlet-name>
    <servlet-class>
        org.apache.cxf.transport.servlet.CXFServlet
    </servlet-class>
  </servlet>
  <servlet-mapping>
    <servlet-name>CXFServlet</servlet-name>
    <url-pattern>/services/*</url-pattern>
  </servlet-mapping>
</web-app>

The most frustrating portion of getting the CXF web service up and running was the following exception:
Invocation of init method failed; nested exception is java.lang.NoSuchMethodError: javax.jws.WebService.portName()Ljava/lang/String;

This is due to the fact that I am running WebLogic 9.2, which contains a library with an older version of JSR (Java Specification Request) 181. The quickest solution for me was to prepend geronimo-ws-metadata_2.0_spec-1.1.1.jar to the WebLogic classpath. This will likely not be the solution I choose to implement in the end, but it got me back up and running. It seemed I also had to clear my WebLogic cache for this fix to take effect. Because I often find instances where this seems necessary, I have created a Windows script to clear the Weblogic Cache. If you run into app server related issues, this was one area I found the Apache CXF docs to be helpful.

Also, if you are running Hibernate, you may encounter ASM incompatibilities between Hibernate’s CGLib and the version of ASM which CXF requires. But do not fret because this is easy enough to solve.

Once this was solved, the list of services was available. The context root for my web project is authManager, so my regular web index page is available at http://localhost:7001/authManager/. The list of web services is then automagically generated by CXF at http://localhost:7001/authManager/services/.

The final step is to build the client. This was very easy when compared to getting the server up and running because I was able to simply swipe the code from the Apache CXF documentation. So, without further ado:

package com.company.auth.client;

import org.apache.cxf.interceptor.LoggingInInterceptor;
import org.apache.cxf.interceptor.LoggingOutInterceptor;
import org.apache.cxf.jaxws.JaxWsProxyFactoryBean;

import com.company.auth.bean.Employee;
import com.company.auth.service.AuthService;

public final class Client {

    private Client() {
    } 

    public static void main(String args[]) throws Exception {

    	JaxWsProxyFactoryBean factory = new JaxWsProxyFactoryBean();

    	factory.getInInterceptors().add(new LoggingInInterceptor());
    	factory.getOutInterceptors().add(new LoggingOutInterceptor());
    	factory.setServiceClass(AuthService.class);
    	factory.setAddress("http://localhost:7001/authManager/services/cxfAuth");
    	AuthService client = (AuthService) factory.create();

    	Employee employee = client.getEmployee("0223938");
    	System.out.println("Server said: " + employee.getLastName() + ", " + employee.getFirstName());
    	System.exit(0);

    }

}

Wow! Wasn’t that cool? (Yes, I’m a dork :o) You should now be up and running with a CXF web service.

If you are looking for something to learn next then may I suggest our tutorial on adding security to your web service.  That tutorial will also show you how to setup the client using Spring, which you may find helpful as well.

Running Ant within Eclipse

01/30/2008

I tried to run an Ant target within Eclipse today and got a fun error:

BUILD FAILED
java.lang.NoClassDefFoundError: com/sun/javadoc/Type

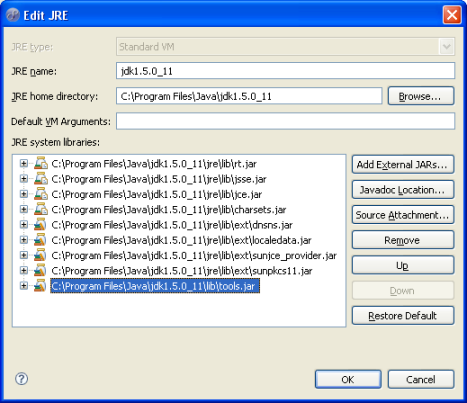
This happened because Ant could not find tools.jar, which contains classes to used to run javac and javadoc. The solution:

  • Open up Window->Preferences->Java->Installed JREs
  • Set your default JRE to a JDK/SDK
  • Open up the one you just set as default, click “Add External JARs”, and then add tools.jar located in the JDK lib directory.

Eclipse’s Edit JRE Screen

Hibernate ASM Incompatibilities

01/29/2008

A few times now I’ve tried to use ASM 2.2.3 in an application that was utilizing Hibernate. It doesn’t work the way you’d hope. The easiest solution I’ve found is to remove the CGLib and ASM (1.5.3), which come with Hibernate and instead replace them with a copy of cglib-nodep. Using the no dependencies version of CGLib you can safely use the newer ASM without conflict.

I’ve heard this problem was occurring for Spring users before version 2.5. The two places I’ve encountered it were alongside Groovy and today with CXF.  This solution worked in both instances and I am now using both Groovy and CXF alongside Hibernate without any Java exceptions being thrown.

Welcome – Lumidant’s First Blog Post

01/28/2008

I’ve been creating websites for years, since I started Tab World Online while in high school. That site was receiving 1 million page views per month before I sold it, though admittedly I knew comparatively little about web development at the time. So today, I decided I’d take the plunge, live in the spirit of the times, and start a blog. I pick up quite a lot of knowledge on a day-to-day basis that I thought would be worth passing along, so in that spirit I’ll share what it took to get this blog up and running:

The first step was choosing a blogging platform. I chose WordPress for two reasons. The first being that it’s probably the most common blogging platform, which I find is helpful for locating themes, plug-ins, and support. The second is that I was having discussions with a potential client about importing his current site from an outdated, cludgy CMS to WordPress.

Then it was time to get the ball rolling, so I followed the WordPress 5 minute installation.

Visiting my newly created blog showed a sample post on a very ugly site (no offense to the default theme creator). It was clear that a new site design was imperative to getting started blogging. I did a Google search for WordPress themes and found one released under the GPL called Almost Spring. I tweaked it a bit to fit my needs, starting with adding the Lumidant logo to the page header, which was easy enough since the header was in a file called (surprise!) header.php.

The next essential step towards getting started was changing the URL structure. By default links looked like:

http://www.lumidant.com/blog/?p=123

This isn’t great for search engine optimization purposes and really it’s just not as pretty or as intuitive as the alternative I chose:

http://www.lumidant.com/blog/getting-started-blogging/

I’m not sure why the date and name based option isn’t used as the default, but it can be found under “Options >> Permalinks >> Date and name based”. Perhaps it is to allow WordPress to run on hosts without mod_rewrite enabled. I chose the custom option of just my post name as I believe it will be better for SEO since some search engines prefer posts which are not buried deeply in many layers of directories. I think sites should be designed for people first and foremost, so the shorter URL makes me smile.

I personally prefer tagging to categorizing and replaced the categories with a tag cloud by simply calling the handy function wp_tag_cloud(). I added the RSS images to the theme as well, which can be found under wp-includes\images.

Finally, I thought I’d see how many visitors this new blog would garner, so I installed the Ultimate Google Analytics WordPress plug-in and configured it by going to “Options >> Ultimate GA” in the WordPress admin screen. Among other reasons, this is preferable to simply pasting the tracking code in the theme footer because it allows you to switch themes. Only problem is that when I viewed the HTML output I noticed the plug-in was utilizing the legacy analytics code, so I had to update the plug-in source to utilize the newer tracking code. If you do this yourself, just remember to escape the single quotes in the analytics source with a ‘\’ character:

<script type="text/javascript">
    var gaJsHost = (("https:" == document.location.protocol) ? "https://ssl." : "http://www.");
    document.write(unescape("%3Cscript src=\'" + gaJsHost + "google-analytics.com/ga.js\' type=\'text/javascript\'%3E%3C/script%3E"));
</script>
<script type="text/javascript">
    var pageTracker = _gat._getTracker("'.uga_get_option('account_id').'");
    pageTracker._initData();
    pageTracker._trackPageview();
</script>

Undoubtedly, I will continue to make other changes to this blogging layout as I familiarize myself to the WordPress environment, but I’m an 80/20 type of guy and this blog’s close enough to 80% done to share with the world now.

Newer Posts