Popular Posts

Sorry. No data so far.

Ben McCann

Co-founder of Connectifier.
Investor at C3 Ventures.
Google and CMU alum.

Ben McCann on LinkedIn Ben McCann on AngelList Ben McCann on Twitter

HTTP API Design

12/12/2014

Here are some things I consider when designing a web API.

Consider using the following response code:

  • 200 – OK
  • 400 – Bad Request
  • 500 – Internal Server Error
  • 401 – Unauthorized (i.e. authentication error)
  • 403 – Forbidden (i.e. not authorized)
  • 404 – Not Found

Version your API
Use limit and offset for pagination
Return JSON responses by default with camel case property names
Append extension to URL to indicate other types (e.g. /person/123.xml)
Host APIs off a subdomain like api.yelp.com
Use OAuth 2.0 for authentication
Pretty print the results by default

Running Marathon and Mesos with Panamax

09/03/2014

Technology Overview

Panamax is a new tool that allows you to manage multiple Docker containers and to link them together. In this post, I’ll talk about creating a Panamax template which will allow you to run Marathon and Mesos in Docker containers. Mesos is a cluster manager, which allows you to run many jobs in a fault-tolerant manner. It can scale to thousands of machines and is well suited for running large jobs like Hadoop or running many different services in a microservice architecture. Marathon is a Mesos framework which provides a UI for scheduling jobs on Mesos. Marathon and Mesos both rely on a distributed application called Zookeeper to store configuration information. Panamax is very helpful in wiring together Marathon, Mesos masters, Mesos slaves, and Zookeeper instances.

Running Panamax

Panamax has some great installation instructions. Locally it depends on Vagrant and VirtualBox to create a CoreOS instance on which to run the Docker containers. I got a bit hung up on running it for the time and the VM wouldn’t start. I debugged this problem by opening the VirtualBox UI and running the VM manually. It turns out that I didn’t have virtualization extensions turned on in my BIOS on this computer yet, so I got the error message “VT-x is disabled in the BIOS.” Most computers have VT-x disabled by default as a security precaution, so if you’ve never turned VT-x on, you’ll have to do so.

Creating a Panamax application

The first step of creating a Panamax application is to find Docker containers to use. This part was trickier than I imagined given that this was my first time using Docker. I first tried to use thefactory/marathon Docker image. However, it turned out that the version they published did not match what was in the Docker description because the DockerHub automated build didn’t build one of their commits, and so Marathon wouldn’t actually run. I filed a bug on this issue and it has since been fixed, so it would be a great image to try again. It’s always good to review the docker images you use. E.g. I ended up using the redjack/mesos-master and saw that it was doing some of its software installation over insecure HTTP, so I sent them a commit that they merged to change it to HTTPS. I also saw that it was using Ubuntu 14.04, but using the Mesos install for 12.04, so I also sent a pull request to have it use the correct Mesos install and upgrade it to Mesos 0.20 at the same time.

One problem with the way I set things up was that the initial download of all the images takes a long time. I used images from a few different sources and they all used slightly different base OS images. They’re quite big nearing 1GB each and need to be downloaded. If they used the same base file then it’d only have to be downloaded once. Now that the issue the thefactory images is fixed, it’d probably be nice to try to give those images another shot in order to speed up usage of the Panamax template.

One of the things you’ll have to figure out is how to pass configuration information to your docker containers. I passed some command line flags directly in the Docker run command. Another great strategy is to run services with wrapper script that reads config from environment variables as is done in this script in the CenturyLink MySQL Docker image.

Running the template

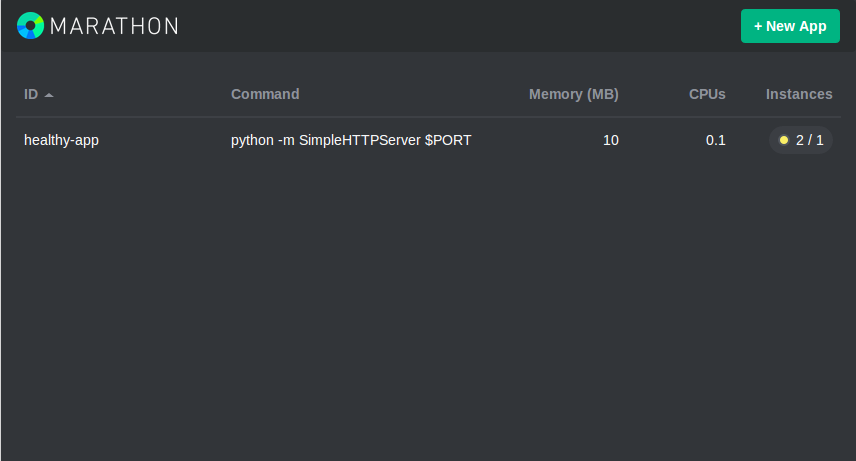
You can find my template by searching for “Marathon on Mesos and Zookeeper” from the Panamax Contest Templates. It has some great instructions for getting started, so I won’t rehash them here. After the various images are up and running and you’ve set the required settings, you should be able to see a Marathon screen like the following:

marathon-sample-app

Things to watch out for

Panamax seems to struggle with being disconnected from the internet while downloading an image, so be sure you have time to wait for your downloads to complete. As long as you’re plugged in and not going anywhere you shouldn’t have any problems. The other issue I had was a hard time saving my Panamax template because it wasn’t dealing well with GitHub accounts with lots of repos. That issue has already been fixed, which is evidence of how quickly this project is moving. I also wasn’t sure if it was possible to test local Docker images as part of a Panamax application, so it seems like you’ll want to publish any images you plan to use.

You’ll also have to be careful to create good documentation for your Panamax templates and to use templates with good docs. I saw that someone else posted a Mesos template, so I tried it out to see how it would compare to mine, but was unable to run it. I thought for awhile that it was broken and wouldn’t work, but I think now that it’s probably a case of missing documentation instead. However, those missing docs could cause hours of debugging. Panamax is really easy to use and has a nice UI, but there’s still technology under the covers that has to be configured correctly when using it.

Future improvements

The thing I’d most like to see change is for Marathon to offer better authentication and authorization support. I’ve submitted a pull request to the Chaos Web Framework, which was created for use by Marathon and Chronos, to make this possible.

Marathon on Panamax template interest

This blog post was mentioned in the CenturyLink Labs newsletter. I tweeted about this template and it was favorited or retweeted by several folks including Marc Averitt (Managing Director of Okapi Venture Capital) and AllThingsMesos. Ross Jimenez (Director of Software at CenturyLink Labs) tweeted as well and was retweeted and favorited by several folks including Florian Leibert (Founder of Mesosphere), the Panamax Project, and Lucas Carlson (CIO of CenturyLink Labs and CEO of AppFog). GrĂ©gory Horion said this was his favorite Panamax template (besides the Locomotive CMS template he created đŸ™‚ and this Tweet was favorited by the engineering team at Twitter. Seen this template mentioned other places? Let me know!

What’s next for Panamax

Panamax is a very cool project. One of the biggest things that the Panamax team is working on is support for multiple hosts. Things will really start to get fun then. It will be very cool to see this deployed in production. I can see web hosts really loving something like this since it’s great for running software like WordPress where there are multiple components that need to linked together such as PHP, Apache, and MySQL.

How to take over the computer of a Jenkins user

08/14/2014

I recently began using Jenkins and found quite a bit of security indifference. This is unfortunate because Jenkins is the world’s leading continuous integration server used for testing, building, and deploying code. According to RebelLabs, Jenkins has 70% market share, with the next closest competitor having only 9%. I’ve raised these issues with the Jenkins team and have received only dismissive responses thus far. The response I’ve received and the fact that Jenkins has over 50 open bugs filed against it which are categorized as critical security issues and leaves me with little confidence that the team will move on these issues unless attention is drawn to them, which is why I’ve written this post.

Unsecure installation

Let’s start at the beginning and walk through the install instructions. The very first step on Ubuntu is:

wget -q -O - http://pkg.jenkins-ci.org/debian/jenkins-ci.org.key | sudo apt-key add -

Here are the first two steps on Redhat:

sudo wget -O /etc/yum.repos.d/jenkins.repo http://pkg.jenkins-ci.org/redhat-stable/jenkins.repo
sudo rpm --import http://pkg.jenkins-ci.org/redhat-stable/jenkins-ci.org.key

If you haven’t noticed anything wrong yet, you’re not alone. I didn’t either the first time I followed these instructions. The issue here is the http://. When you download software from a Linux repository, the system verifies downloaded packages against a gpg signature. Debian has been using strong crypto to validate downloaded packages since 2005, so this is a long standing best practice. However, if you download this signature over an insecure channel, then there is little point because anyone who could deliver a malicious package could also deliver a malicious signature. For this reason, you should only use https with “apt-key add” or else you are rendering void any security it provides. Indeed if you Google “apt-key add” the very first result you get is a StackOverflow post which says “adding keys you fetch over non-HTTPS breaks any security that signing packages added. Wherever possible, you should download keys over a secure channel (https://)”. If only Jenkins would properly configure their SSL certificate for downloading this file and update their docs to suggest https!

Unsecure updates

Jenkins by default loads the URLs to use for updating plugins from http://updates.jenkins-ci.org/update-center.json. This is a problem because Jenkins will download and install whatever package URLs are listed in this file, so if an attacker can modify this file they can install whatever malicious plugins they want. I attempted to remedy this with a one-character pull request to change http to https which was rejected as being too load intensive upon Jenkins servers. I was told on the bug that I filed for the issue that there’s a signature embedded within the file which makes it secure. The problem here is that you need a key which you received securely to check that signature. Because the key is delivered over HTTP as already discussed, much of its value is lost.

Unsecure plugins

A response I’ve gotten to the preceding issue is “You realize that anyone with a Jenkins-ci.org account can release updates to any plugin, right?” So why bother delivering widely used plugins securely when they could be malicious before they ever leave the Jenkins servers? I could update all the most popular Jenkins plugins with malicious code and no doubt thousands of people would update their plugins and find themselves running malicious code. The plugins are all open source, but I have no idea if I’m running the code that I see open sourced. An attacker could download the code for a plugin, modify it in an evil manner, and release an update to that plugin and there’s no way to know whether the code downloaded matches what is in the open source repository.

The irony here is almost killing me. Using Jenkins to build the plugins instead of letting “anyone with a Jenkins-ci.org account” build them would be a great solution to this problem. I was told that fixing this problem would violate “Jenkins project core principles, so you should probably build a better case than ‘this is wrong’ before you bring it up on the dev list.” Without further explanation I’m left wondering why closing security holes would violate Jenkins project core principles. Looking at the core principles only seem to reinforce the idea that these problems should be fixed. It would lower the barrier to entry by making it such that plugin developers don’t need to figure out how to publish them since a continuous integration server could do it. It seems meritocratic to fix security issues raised by the community. It would increase transparency to know that you’re running the code you see available on GitHub and not some attacker’s code. It would not affect compatibility or code licensing. It certainly would be a more automated solution (someone get Alanis Morissette on the phone before I die).

Unsecure for contributors

You can’t even work on Jenkins without facing security problems. If you try to write a plugin for Jenkins, for example, the docs suggest you add the following to your Maven settings:

      <repositories>
        <repository>
          <id>repo.jenkins-ci.org</id>
          <url>http://repo.jenkins-ci.org/public/</url>
        </repository>
      </repositories>
      <pluginRepositories>
        <pluginRepository>
          <id>repo.jenkins-ci.org</id>
          <url>http://repo.jenkins-ci.org/public/</url>
        </pluginRepository>
      </pluginRepositories>

Again, downloading software over http is not secure. I was told this is a “cosmetic issue” when I filed a bug though I’m hoping the engineer that the bug is assigned to will see that telling users to connect to http is a bit more than that. To help demonstrate this point, I linked to an article which shows how to exploit exactly this problem in my bug report. As a result of that article, Sonatype (who host the most popular Maven repository) is turning on SSL for all users. It is not yet apparent that this will sway anyone working on Jenkins.

Consequences

So what can you do by getting someone to install a malicious version of a Jenkins server or plugin and how hard is it? Well, there’s already a proof-of-concept for launching a Man-in-the-middle attack against a Maven repository http download and it’s pretty basic code, so I think it’s fair to say that it can be done. If you go to a Jenkins Meetup there’s a chance you’ll be able to snag someone downloading some Jenkins-related software over an unsecured wi-fi connection and be able to infect them. The types of folks who would install Jenkins on their laptops are also somewhat likely to have access to production systems at their companies. And because Jenkins is used to build software that means a malicious version could potentially inject further maliciousness into the software that it’s building or leak the source code of that software to an attacker.

If you care about building secure software, I hope that you’ll ask the Jenkins team to fix these issues and make sure other Jenkins users are familiar with these holes until then. You can also check out https://www.connectifier.com/careers.

Shared GMail account with SAML

08/14/2014

SAML is a protocol which securely provides an identity. Using an identity provider which supports SAML, you can setup Single Sign On. However, if you have multiple people sharing a GMail account, things get a little tricky. Here’s how you can set that up for Okta, which is one such identity provider.

Application: Template SAML 2.0

General:

Post Back URL https://www.google.com/a/<domain>/acs
Name ID Format EmailAddress
Recipient https://www.google.com/a/<domain>/acs
Audience Restriction google.com
authnContextClassRef PasswordProtectedTransport
Response Signed
Assertion Signed
Request Compressed
Destination https://www.google.com/a/<domain>/acs
Default Relay State https://gmail.google.com/a/<domain>

Sign On:

SAML Issuer ID google.com/a/<domain>
Default username format Custom – <SharedEmail>

When you assign this application to someone, make sure that the SharedEmail is filled in as the username

Migrating from MongoDB to TokuMX

05/13/2014

First be sure to install the latest version of TokuMX on the target machines, which is currently 1.4.2.

Also, for all long-running commands, you’ll want to run them in a tmux session. You can create a new tmux session with tmux new, attach to the default session with tmux attach -d, and quit a tmux session with exit after you’re in it.

Run the following commands on the MongoDB secondary with credentials and paths updated to match your environment:

sudo service mongodb stop
sudo mongodump -u adminuser -p 'password' --dbpath /var/lib/mongodb --journal

Connect to the Mongo primary admin DB and run rs.status(). Get last timestamp from secondary and use it in the mongo2toku command below. You can now restart the MongoDB secondary with sudo service mongodb start.

If you want to copy a file from one machine to another with scp, you’ll want to ssh to the first machine using the -A option to enable forwarding of the authentication agent connection. Note that if this is a long running copy command, you’ll want to use tmux, but the -A option will only work with tmux new and not tmux attach -d without jumping through a bunch of extra hoops. So, using ssh -A and tmux new copy the files to the new machine:

scp -r dump remoteip:/media/ephemeral0/mongodump

Now run the following on the Toku primary being sure to use your credentials, data paths, and oplog time:

sudo mongorestore --dbpath /media/ephemeral0/tokumx dump
mongo2toku --from rs/primary:27017,secondary:27017 --ruser adminuser --rpass 'password' --host localhost:27017 --authenticationDatabase admin -u adminuser -p 'password' --ts=9999999999:9

Finding the size of all MongoDB collections

04/28/2014

Here’s a helpful script for finding the size of every table in MongoDB in MB:

var collNames = db.getCollectionNames();
for (var i = 0; i < collNames.length; i++) {   
  var coll = db.getCollection(collNames[i]); 
  var stats = coll.stats(1024 * 1024); 
  print(stats.ns, stats.storageSize);
}

Sound Insulation for Noisy Offices

03/06/2014

I’m a founder at Connectifier, a fast growing tech startup in Newport Beach, CA. We also have an open floor plan, which is great for keeping everyone in the loop, but less awesome for quiet concentration. We also have many amenities such as a kitchen, ping pong table, and sofas, but want to keep separation between heads down work spaces and collaborative spaces. As we grow, a space that originally held two people now holds closer to a dozen and the office is starting to get noisier. This will only continue as we grow unless we find a solution.

In order to plan for our growth, I investigated several office noise solutions. Here’s an idea of what I found.

Ikea Risor Room Divider – $99
ikea-risor

Room.com Phone Booths – $3495

TalkBox Booth – $4450 for single occupancy

Framery Phone Booths – $8,000 for a Framery-O and $17,000 for a Framery-Q unit
framery

Clearsonic MiniMega Isolation Booth – ~$2,750 + $200 shipping
clearsonic-isolation-booth

Vocalbooth.com – ~$6000 depending on model. Shipping included
vocal-booth

Buzzispace – ~$8,000 for Buzzibooth, $2,371 for Buzzicockpit
buzzibooth

Airea Phonebooth with door – ~$6,500 + shipping
airea-phone-booth

Lada Cube also has several options, which they say go for $156/sq.ft.

In the end, we ended up waiting until we moved into a larger office and hiring a contractor to build phone booths into the office itself. Some of the cheaper options like room.com and TalkBox weren’t available yet and it ended up being far more cost effective than the options that were available at the time. I also ended up picking up a pair of Bose QuietComfort 35 headphones. They’re quite pricey for headphones, but well worth the cost.

Debugging tools for java.lang.OutOfMemoryError: Java heap space

02/22/2014

If you have a Java app that’s crashing due to out-of-memory errors then you can create a heap dump by utilizing the following flags:

-XX:+HeapDumpOnOutOfMemoryError -XX:HeapDumpPath=/tmp/mydump.hprof

To read the head dump, you’ll need to:

  • Install eclipse memory analyzer
  • Open eclipse with lots of memory: eclipse -vmargs -Xmx6G
  • Open memory analysis perspective: Window > Open Perspective > Other > Memory Analysis

TodoMVC: An Angular vs React Comparison

01/21/2014

Two of the more talked about frameworks today are Google’s AngularJS and Facebook/Instagram’s React, but there are limited comparisons between them. TodoMVC is a project which aims to provide a comparison of JavaScript frameworks by implementing a todo list in the most popular frameworks. I have a little experience with Angular and none with React. I looked at both the Angular TodoMVC app and the React TodoMVC app to try to compare them and was very intimidated that the React one took twice as many lines. In this blog post, I’ll aim to break down the code differences between the AngularJS and React versions and try to decide whether React really is much more verbose and cumbersome to write or if there was some difference in implementation and coding style between the two which had a larger affect.

One thing TodoMVC does is allow the user to type onto the list, and if the user hits enter, it moves the current item down and creates a new empty space for a new item.

Here’s the React version for creating a new item:

handleNewTodoKeyDown: function (event) {
  if (event.which !== ENTER_KEY) {
    return;
  }

  var val = this.refs.newField.getDOMNode().value.trim();

  if (val) {
    var newTodo = {
      id: Utils.uuid(),
      title: val,
      completed: false
    };
    this.setState({todos: this.state.todos.concat([newTodo])});
    this.refs.newField.getDOMNode().value = '';
  }

  return false;
},

Here’s the Angular version:

$scope.addTodo = function () {
  var newTodo = $scope.newTodo.trim();
  if (!newTodo.length) {
    return;
  }

  todos.push({
    title: newTodo,
    completed: false
  });

  $scope.newTodo = '';
};

Much of the extra code in React is because it is listening for a key and then deciding if it was the enter key whereas Angular was simply listening for a submit. This seems likely to be not related to the framework, but merely a difference in implementation in this case.

Let’s look at removing an item from the list. This also takes additional lines in React:

destroy: function (todo) {
  var newTodos = this.state.todos.filter(function (candidate) {
    return candidate.id !== todo.id;
  });

  this.setState({todos: newTodos});
},

And here’s the Angular version:

$scope.removeTodo = function (todo) {
  todos.splice(todos.indexOf(todo), 1);
};

The big difference here is that React creates a new array whereas Angular alters the existing array. I’m not familiar enough with React at this point to know if there’s a requirement to avoid mutating the data structures. However, it’s important to note that the implementation here in React does not work in IE8 because of the use of Array.filter. Throughout the code base, it is a very common theme that much of the extra code results from the React implementation using immutable data structures.

The React also has some extra code for performance improvements. It has included a shouldComponentUpdate method as an example of how performance improvements can be made with React. This is method is not necessary and is used to demonstrate how you could make such an improvement.

/**
 * This is a completely optional performance enhancement that you can implement
 * on any React component. If you were to delete this method the app would still
 * work correctly (and still be very performant!), we just use it as an example
 * of how little code it takes to get an order of magnitude performance improvement.
 */
shouldComponentUpdate: function (nextProps, nextState) {
  return (
    nextProps.todo.id !== this.props.todo.id ||
    nextProps.todo !== this.props.todo ||
    nextProps.editing !== this.props.editing ||
    nextState.editText !== this.state.editText
  );
},

However, this creates extra code besides just this method. The React version also tracks whether the user is in an “editing” state, which is something Angular does not have any code devoted to and which is only ever used in the shouldComponentUpdate function. This means we need a cancel function and about half a dozen other places to track state that are not present in the Angular version.

cancel: function () {
  this.setState({editing: null});
},

Some extra code in React is needed in order to show optional components because it requires making an extra variable which sometimes has its value set:

var footer = null;
if (activeTodoCount || completedCount) {
  footer =
    <TodoFooter
      count={activeTodoCount}
      completedCount={completedCount}
      nowShowing={this.state.nowShowing}
      onClearCompleted={this.clearCompleted}
      />;
}

In Angular, no extra extra lines are required to show an optional attribute and instead you simply use ng-show or ng-if:

<footer id="footer" ng-show="todos.length" ng-cloak>

Similarly, switching between all, completed, and active todos is quite cumbersome in React:

var shownTodos = this.state.todos.filter(function (todo) {
  switch (this.state.nowShowing) {
    case ACTIVE_TODOS:
      return !todo.completed;
    case COMPLETED_TODOS:
      return todo.completed;
    default:
      return true;
  }
}, this);

That took 10 extra lines for something that takes no extra lines in Angular:

<li ng-repeat="todo in todos | filter:statusFilter track by $index" ng-class="{completed: todo.completed, editing: todo == editedTodo}">

A big portion of the extra lines in the React example are also due to coding style. HTML elements which would more typically be placed on a single line have been split between several in the React example:

<input
    id="toggle-all"
    type="checkbox"
    onChange={this.toggleAll}
    checked={activeTodoCount === 0}
    />

Here’s that same code in the Angular example:

<input id="toggle-all" type="checkbox" ng-model="allChecked" ng-click="markAll(allChecked)">

Most of these difference are just implementation or style differences. I think it’s nice to show each example using the idioms of that framework. It may also be nice for TodoMVC to make some basic guidelines so that apps get implemented analogously (e.g. whether to use a submit listener or keypress listener to determine item completion). The one thing that I think would be really annoying is the manner in which React handles if statements in templates vs. the way that this is done in Angular which is much less verbose. I’m also curious about the React implementation’s aversion to mutating state, which seems quite unique to that framework.

Getting started with the Go Language

01/04/2014

Here are a few tricks I picked up when trying to get started with go.

Firstly, don’t install Ubuntu’s version of go as you’ll get an old one. Instead, use gvm to install go1.2 or whatever the latest is.

Secondly, be careful to structure your code in the right directory format. If you do not have the correct directory structure it will cause certain errors such as a “cannot find package” error when running “go test”. E.g. if you create a directory named gocode and want to check code out from github into that directory, you must have it in the src/github.com/organization directory such as:

gocode/src/github.com/fsouza/go-dockerclient

You’ll need to add the directory containing all of your Go code to the GOPATH environment variable. E.g. I did this with:

export GOPATH=$GOPATH:/home/${USER}/src/gocode

You’ll also probably want godep installed since many packages use it for managing dependencies:

go get github.com/tools/godep
Newer Posts
Older Posts